How to Import a Simple Database to Calendar
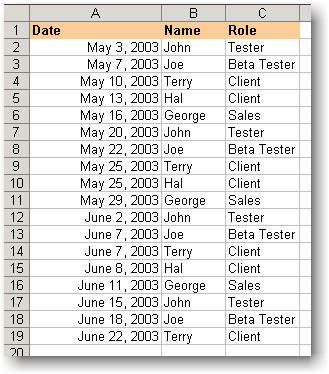
Assume that you have the following database.
- Date: The column A
contains the MS Excel format Date
- Name: The column B contains
the Name of activities or person
- Role: The column C
contains the Role (This is optional)
The data is stored in DB_Case_01.XLS file.
Step 1:Open the Database
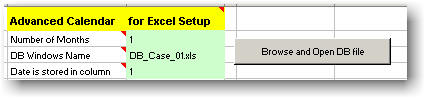
Click the "Browse and Open DB File" button and open the DB_Case_01.XLS
file in the
C:\Program Files\BaRaN Systems LLC\Calendar for Excel folder.
Make sure that all corresponding fields are set as shown below.
Step 2:Run the Program
Select "Calendar..." option from the Excel Tools menu.
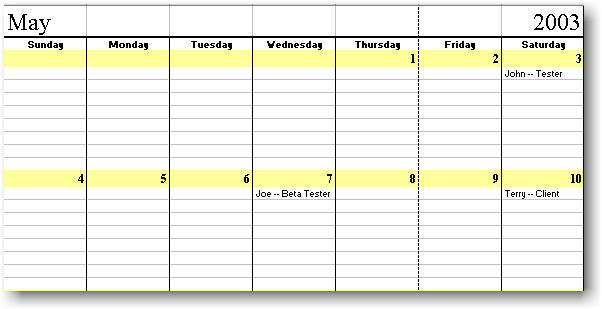
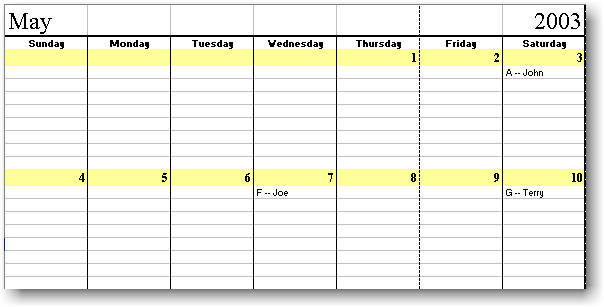
Make sure you enter 1-May-2003 as start date and select
Data Base as type.
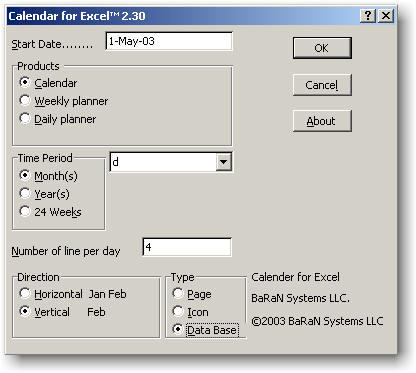
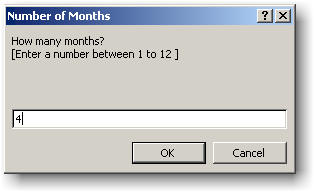
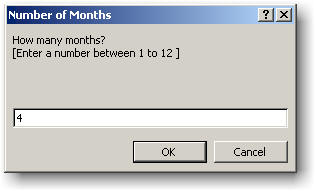
Click the OK button. Enter the number of calendar months to be
generated as 4 and click the OK button.
Review the results.
How to Import a Database to Calendar
The program requires that you specify the Date,
Name and
Role. It will automatically generate a Monthly calendar and
for the Date specified it will write the Name and Role data
connected with "-".
The Name and
Role are just identifier and does not necessary means name
and role, just think of them as the 1st and 2nd entries.
Assume that you have the following database stored in a file called
mydata.xls.
- Date: The column
E contains the Date.
- Name: The column A
contains the Task (To be used as
Name field)
- Role: The column
B contains the Name (To be used as
Role field)
Step 1- Start MS Excel
Step 2- Open the Advanced Calendar for Excel (Select
Calendar for Excel from the All Program)
Step 3- Open the data file mydata.xls.
Step 3- Select Option from the Tools menu and make
sure you select R1C1 option and click the OK button.
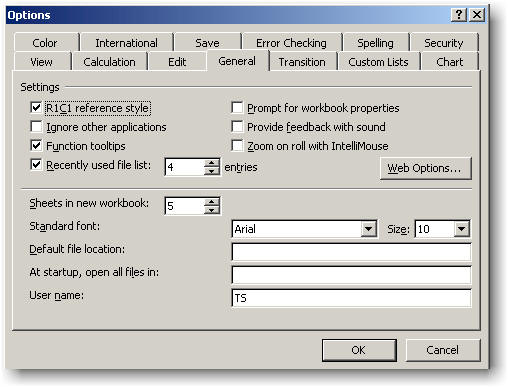
Step 4- Review your spreadsheet (See the column names are
translated to numbers)
Step 5- Remember that the Date
is in column 5, The Name is stored
in column 1 and the Role is stored
in column 2.
Step 6- Select the Advanced Calendar for Excel window and
enter the following
Number of Months
== 1 (Means put all Calendar month under each other)
DB Window Name
== Do not enter
Date is Stored in column == 5
The Date is separated by == Click on the pull down menu and with
up arrow and down arrow select the option
- If the cell contains only the date, select The Column Contains the
DATE option
- If the cell contains the date but is surrounded by other characters,
if you want to type
the preceding and ending characters as CHARACTER (for example space
should
be entered as " " without the double quote.
- If the cell contains the date but is surrounded by other characters,
if you want to type
the preceding and ending characters as ASCII (for example space should
be entered as 32.
Name is stored in column == 1
Role is stored in column == 2
Step 7- Generate the intermediate file
- Select you data file and save it.
- Click the "Build the DB from the Original file" button
- Open your database file mydata.xls
- Review the newly generated database file. This is the standard
file that Advanced Calendar for Excel requires.
Please note that the newly create spreadsheet name (book2) is stored an
the DB windows Name field. You can save this file and open it again
by clicking the "Browse and Open the DB file" button.

Step 8 - Build the Calendar
- Select "Calendar for Excel..." option from the Tools
menu
- Make sure you select the "Data Base" option in the
Type box
- Make sure you enter a Start Date that will contains your database
range (for example 1-Sep-2003).
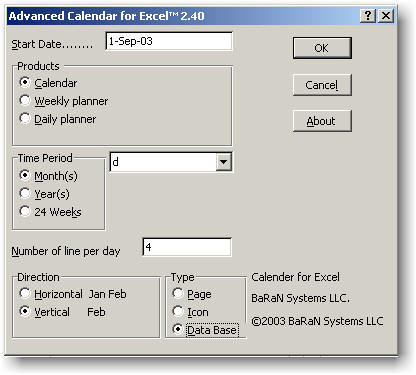
4. Enter the number of months such that it will cove your database
range (for example 3)
5. Review the Calendar
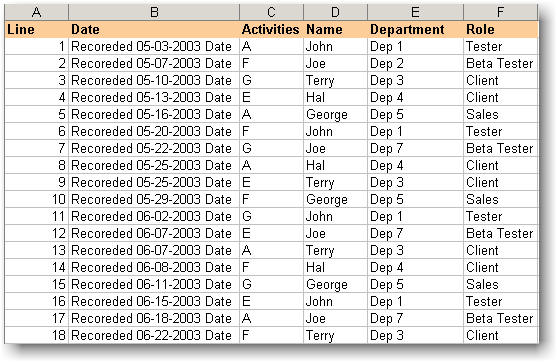
How to Import a Complex Database to Calendar
Assume that you have the following database.
- Date: The column
B contains the Date within another string
- Name: The column C
contains the Name of activities or person
- Role: The column
D contains the Role (This is optional)
The data is stored in DB_Case_02.XLS file in the
C:\Program Files\BaRaN Systems LLC\Calendar for Excel folder.
1
2
3
4
5
6
Enter the following information in the Calendar for Excel menu
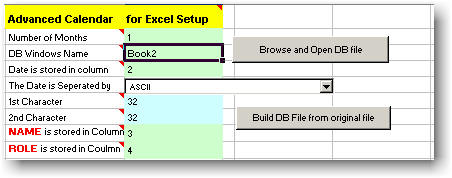
The Date is separated from the string by a SPACE character in the
front and an SPACE character in the end.
Please note that the pull down menu points ASCII.
The ASCII code for SPACE is 32. You can enter a single
SPACE
character in 1st Character and the 2nd Character
cells.
Please note that the NAME (or
Activity in the above Spreadsheet) is stored in the C column ( 3rd
Column) and the ROLE is stored
in the in the column D ( 4th Column ). That is way we have entered 3 and
4 for NAME and
ROLE Fields.

Step 1: Process the file.
- Click the "Build the DB from the Original file" button
- Select your file (DB_Case_02.Xls)
Step 2: Build the Calendar
- Select "Calendar for Excel..." option from the Tools
menu
- Make sure you select the "Data Base" option in the
Type box
- Make sure you enter a Start Date that will contains your database
range (for example 1-May-2003).
- Enter the number of months such that it will cove your database
range (for example 3)
- Review the Calendar
How to Set Calendar for Excel
for Other Languages
Calendar for Excel allows you to change the format of the Calendar to
any acceptable MS Excel International Calendar format. However Please
note that the calendar will be built using MS Excel Standard Calendar
Format. You need to install Calendar for Excel 2.41b or higher
version.
Please do the following steps to change your Calendar for Excel
format.
Step 1: Start the Calendar for Excel,
Step 2: Move the cursor to cell HY1.
Step 3: Enter the Week Day Name data in column IA2 to
IA8
English
Greek

Step 4: Enter the Month Name data in column IA10 to IA21
Step 5: Enter the Format data in column IA22 to IA46

Step 6: Enter the Week Day Names data in column IB47 to
IH47. Please make sure you do not change the cell FORMAT.

 Step Step 7: Enter the
Maximum Number of letters in the WEEK DAY NAME (In the English version
WEDNESDAY has nine (9) Letters). Then enter the WEEK DAY NAME as it is
shown with enough SPACE CHARACTER that each day takes 9 characters).
Step Step 7: Enter the
Maximum Number of letters in the WEEK DAY NAME (In the English version
WEDNESDAY has nine (9) Letters). Then enter the WEEK DAY NAME as it is
shown with enough SPACE CHARACTER that each day takes 9 characters).

Step 8: Click on the button labeled
Step 9: Save the spreadsheet. Make sure you use the same name.
Step 10: Enjoy the new calendars.