Outlook Organizer for Excel™ provides Microsoft® Excel and
Microsoft® Outlook
users to execute the following functionality at ease:
- Make a Backup of all of your
Outlook PST files (and schedule it for future)
- Build a Directory of all of your
folders (Up to 5 level deep)
- Sort all selected mails into
sorted folders
- Define Association
- Transfer all selected mail to
their Associated folder
These functionality are summarized in the following sections:

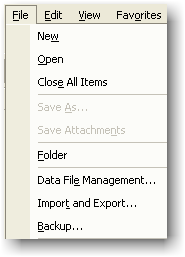
Assuming that you have Microsoft® Outlook installed on your
computer as default e-mail. The Backup program allows you to select
and backup your original Outlook files completely. It provide you
with a reminder to make a habit of backup.
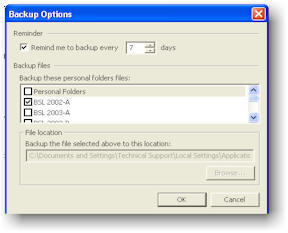
Please review the installation of the backup program
here and make sure that you create a
backup of your PST files before using this program. If you can not install
this program, search for *.PST files and copy them to a backup location.
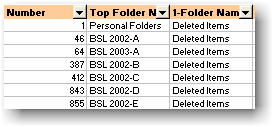
Once you have your backup in a safe place, you can generate a Directory
of all selected mail folders by clicking the
 button. The results are
stored in the Setup worksheet.
button. The results are
stored in the Setup worksheet.
Note: Program creates an outline for your data to let you show
and hide levels of detail with a single mouse click. You can click the
outline symbols  ,
, ,
and
,
and  to quickly display only
the rows or columns that provide summaries or headings for sections of
your worksheet, or you can use the symbols to see details under an
individual summary or heading.
to quickly display only
the rows or columns that provide summaries or headings for sections of
your worksheet, or you can use the symbols to see details under an
individual summary or heading.

Assume that you are interested to organize your Inbox and
Sent Items folders, then you need to select folders to be processes by
the program.
You need to place an R for Received
and an S for Sent in the column
A of
the Setup worksheet in front of the Inbox and Sent Items
folders name as shown below.

Make sure that you have selected the following options in the green
colored cells ( All Cells with green background indicates that the use can
enter data, sometimes the green column header indicates that all cells
below the header are user data entry cells).
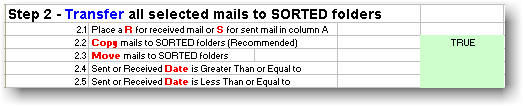
Then click the  button, and the
program automatically based on your choice Moves
or Copies (recommended) the mails to a newly created
SORTED Folder.
button, and the
program automatically based on your choice Moves
or Copies (recommended) the mails to a newly created
SORTED Folder.
For each mail a sub-folder is created with the name of the either From
Name (R Option) or and the First Name in the To List (S Option)
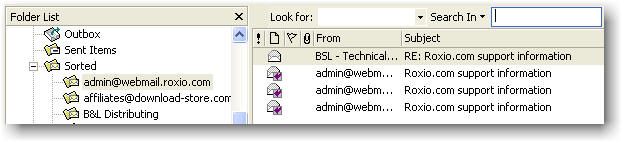
Therefore in the Admin@Web... folder
there are all mail from Admin@Web... and
all mails that you have sent to this address.

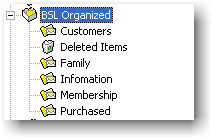
Create a new PST file to organize your e-mails (Select File ->
Open -> Outlook Data File... option and follow the
instructions). In this example we have created a PST file called BSL
Organized.

Click on the folder name and select File -> Folder and
name them accordingly as show below or any other preferences.
Select one e-mail from any folder by clicking the Right Mouse Click and
move it to this folder. The Run the Step [1] to renew the directory
listing, make sure the new folder is displayed in the Setup worksheet.

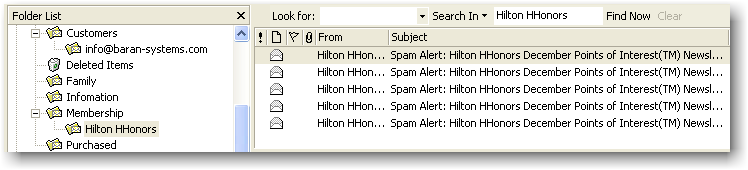
In the column B of the spreadsheet (Alias
Column) copy and paste the folder names as shown.

This will enable the program to associate the corresponding folder with
a single name.
Add the same name for the newly created folder in the SORTED
folder. Basically you are instructing the program to MOVE or COPY all
e-mails in the
COPY TO folder to its
ALIAS
folder.

Make sure that you have chosen the following parameters.

and thenclick the  button.
Once the program finished its work please review the newly created
folders.
button.
Once the program finished its work please review the newly created
folders.

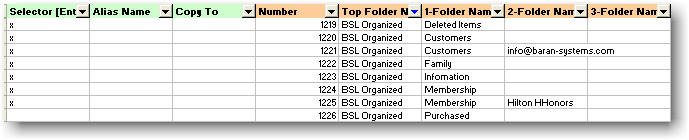
Once you have move enough folders to their correct destinations, you
can use the Association command. To use this functionality, please
place an X in column A of all folders that you would like the
e-mail to be organized into.
Then click the button. The
program will display the following message.
button. The
program will display the following message.
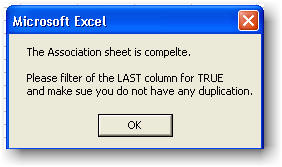
Check the Setup worksheet, the program automatically has set all
folders within the Sort folders to their associated folders.
You just need to set the ALIAS column again, and do the step
above to organize all of your e-mails.
